Searching for Available Rooms and Rates
The feature allows users to search for available and appropriate rooms for the guest's budget and time frame.
Perform the following steps to search for the available rooms:
Navigate to Reservations à Book a Reservation.
Users can either select an existing profile from Search Profile field or enable the Click Create New Profile to create a new guest profile. On selecting the guest’s profile, a hyperlink, Show guest details, is displayed. On clicking the hyperlink, the guest details are displayed. Users can view the list of units owned by the guest selected under the Owned Units section.
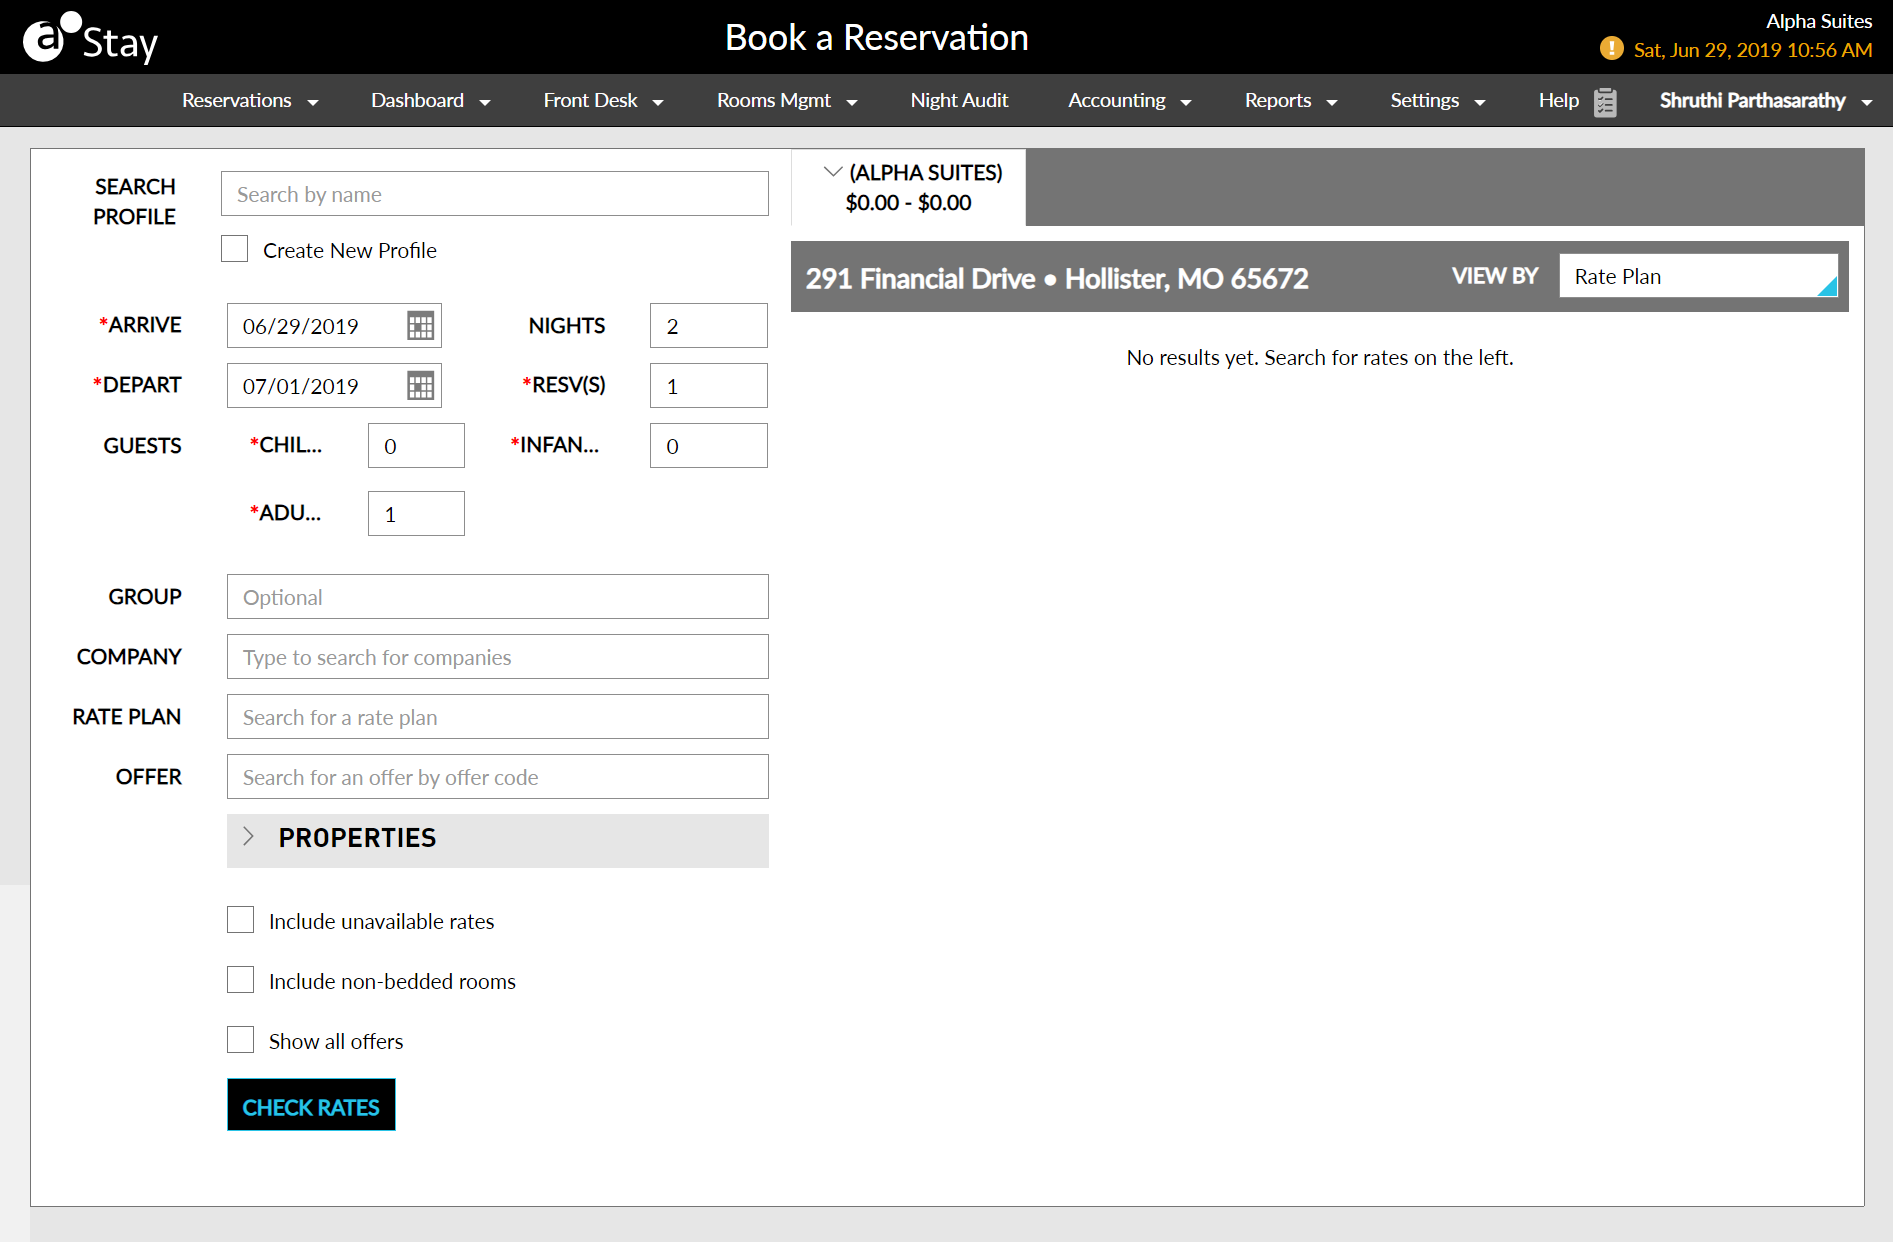
Refer to the following table and fill in the fields to search for available rooms:
|
Field |
Description |
|---|---|
|
Search Profile |
Search the existing guest profile |
|
Create new profile |
Create a new guest profile |
|
Arrive |
Select the guest's arrival date |
|
Depart |
Select the guest's departure date |
|
Nights |
The number of nights in the reservation |
|
Resv(s) |
The number of reservations to be booked |
|
Rooms |
The number of rooms required for a reservation |
|
Guests |
The number of guests to reserve room. Other custom age categories can be set up in the Age Categories setup page |
|
Adults |
The number of adults in the reservation |
|
Children |
The number of children in the reservation |
|
Group |
Search by group name. This indicates that the guest is associated with a group reservation |
|
Company |
Search by company name. This indicates that the guest is associated with a company if the guest is traveling for business |
|
Rate Plan |
Search the specific rate plan preferred by the guest |
|
Offer |
Search the offer code |
|
Player ID |
Search the casino player ID to choose applicable offers |
|
Properties |
Select one or more property from properties if the user has more than one guest property in which the user wants to search for a room |
|
Include unavailable rates |
Includes all the rates in the search |
|
Include Non-Bedded Rooms |
Includes non-bedded rooms in the search |
|
Show all offers |
It shows all the casino-related offers |
Click Check Rates. The list of available rooms on the Book a Reservation page is displayed
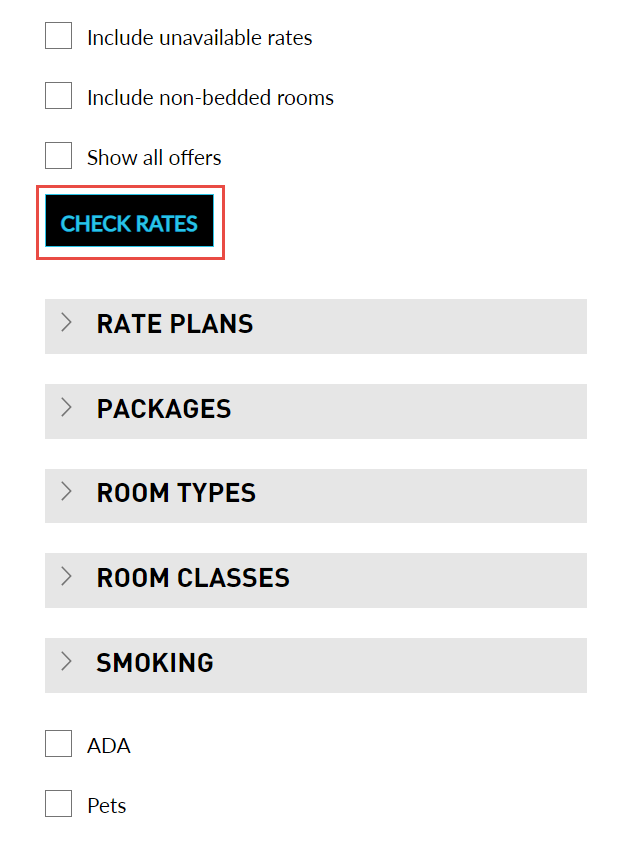
An alert message is displayed in the Book a Reservation screen, when the stay dates selected by the users are not available for booking. The message is displayed in the following scenarios:
-
When there are no rooms available for the selected dates
-
When restrictions are created in the property calendar for the selected dates
-
When rate plans are not available for the selected dates
For example, a Closed to Arrival restriction is placed in the property calendar for the dates, May 11, 2023, to May 15, 2023. When users try to book a reservation for these dates, the rate details will not be displayed. The rate details will be displayed only when users enable the Include Unavailable Rates checkbox and click on the Check Rates button.
The following message is displayed when users try to create reservations for the unavailable dates: One or more of the stay dates are unavailable. Select the Include Unavailable Rates checkbox to view details.

If the ROH room type is not configured in the property, it is not displayed when users click on the Check Rates button.
Refer to the following table and fill in the fields:
|
Field |
Description |
|---|---|
|
Rate Plans |
The rooms that are associated with a specific rate plan |
|
Packages |
Allows the user to search for packages based on the rate plan or package name |
|
Room Types |
The room type that the guest is interested in. For example, a Suite or King |
|
Room Classes |
If there are different classes of room types, select which the guest prefers. For example, a Basic or Grand |
|
Smoking |
This indicates that the guest has a specific need for a Non-Smoking or Smoking room |
|
ADA |
Allows the user to search for an Americans with Disabilities Act (ADA)-compliant room |
|
Pets |
Allows the user to search for a pet-friendly room |
Create New Guest Profile
Users can create a reservation from a new guest profile directly from the Book a Reservation page.
Perform the following steps to create a new guest profile.
Enable the Create New Profile checkbox.
Refer to the following table and fill in the fields to create a new guest profile.
|
Field |
Description |
|---|---|
|
Last Name |
The last name of the guest. |
|
First Name |
The first name of the guest. |
|
Email Address |
The email address of the guest. |
|
Phone Number |
The phone number of the guest. |
|
Source Of Business |
The source of business for the guest. |
|
Guest Type |
The type of guest. |
|
Market Segment |
The market segment associated with the guest |
The following fields are mandatory for creating a guest profile:
-
First Name
-
Last Name
-
Address or Phone Number or Email Address or Loyalty Program
Click Check Rates. The list of available rooms is displayed.
By default, the market codes, Source Of Business, Guest Type, and Market Segment are displayed only when the user clicks the Show More option. Properties can choose if the market codes must be made as mandatory fields and directly displayed as a dropdown in the Book a Reservation page.
Refer to the Market Segments & Sources section on how to make market codes as mandatory fields.
Users can also view room rates based on the guest type. If the Guest Type is made mandatory, users can select the guest type and click Check Rates. Room rates plans applicable for a selected guest type are displayed along with the other room rates plans.
Booking the Room and Adding Guest Details
This option allows users to book the room and add the guest's information for further references.
Perform the following steps to book a room:
Select either Rate Plan or Room Type from the View By list.
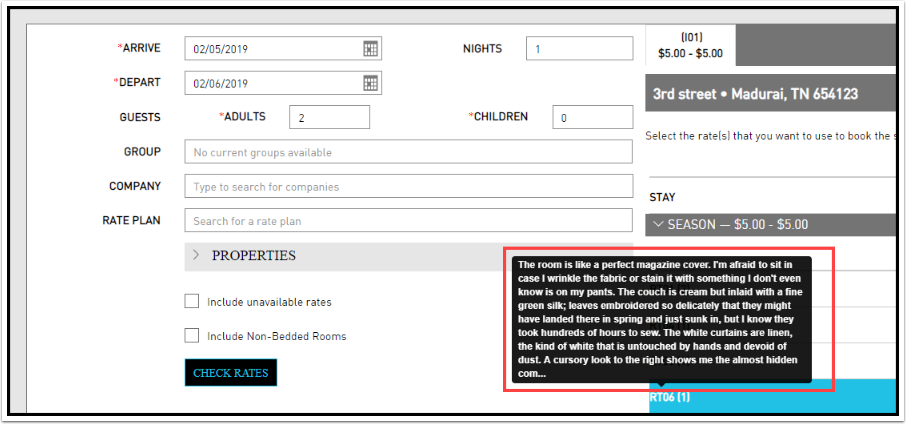
Hover the room type to check the description of the room’s features.
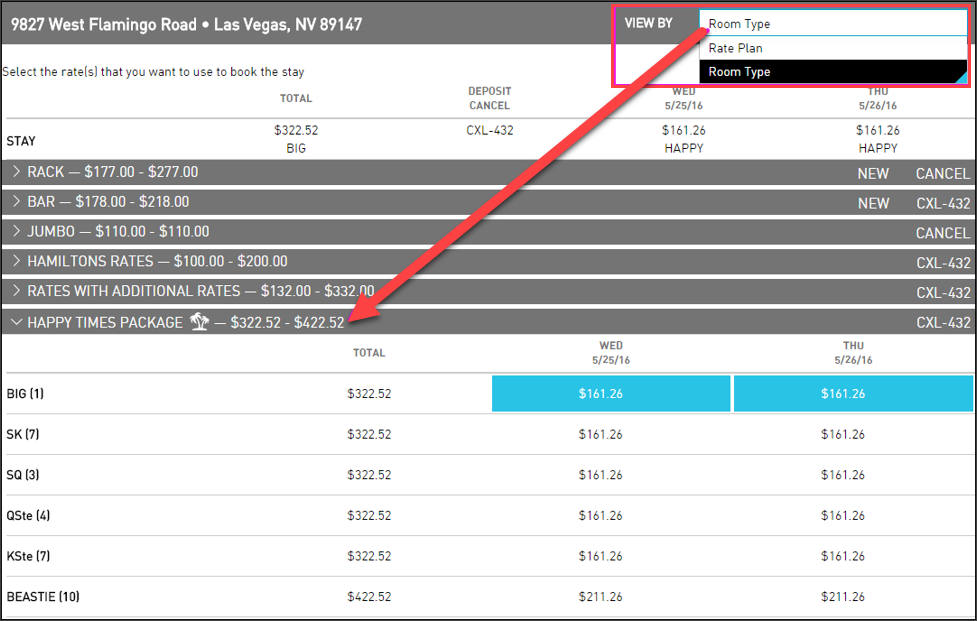
Click to expand the Rate Plan or Room Type groups to view the available rooms and rates.
Select the rates that the user wants to use for the guest's stay. The rate that the user selected is highlighted blue, and selected details appear in the Stay section.
The room type must be the same for every day of the reservation.
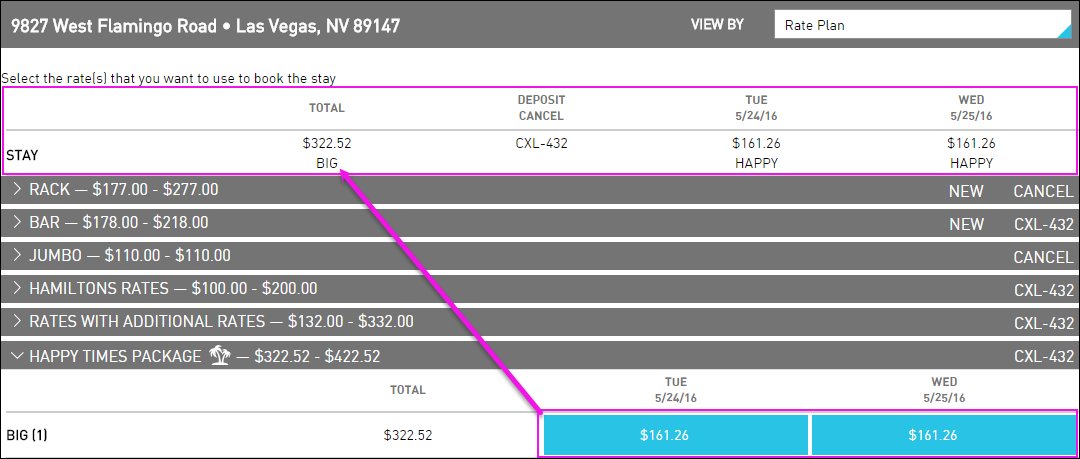
To view a description of the room selected. Hover near the room type to see a description of the room's features.
To change a rate or package rate, click an individual rate or individual package rate in the Stay section. The Adjust Rate dialog box is displayed.
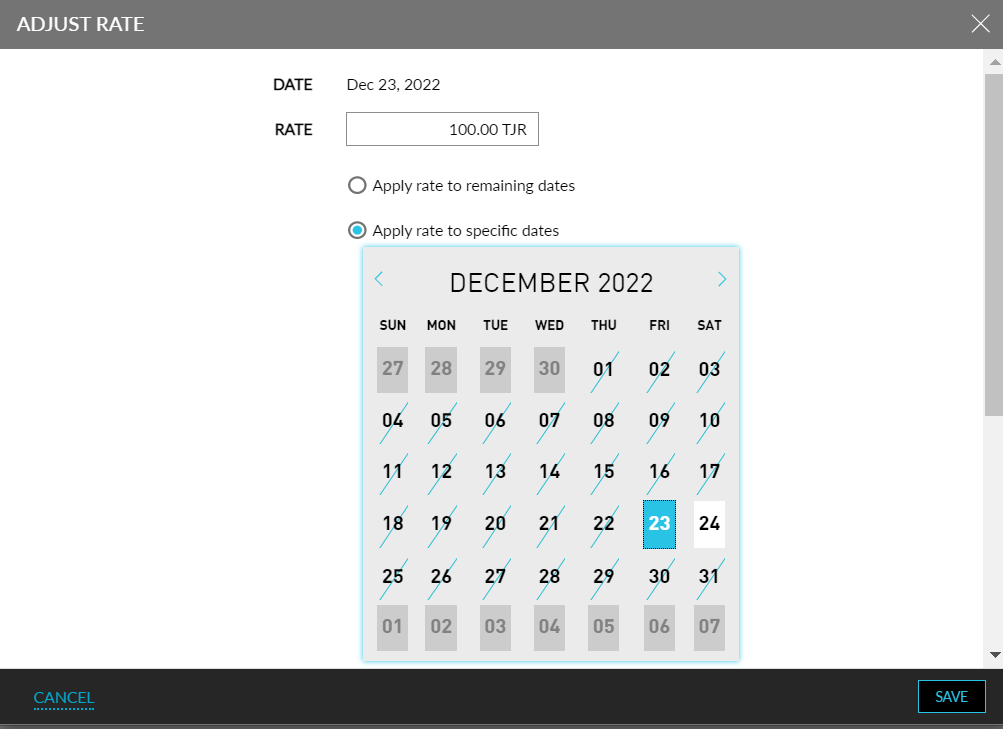
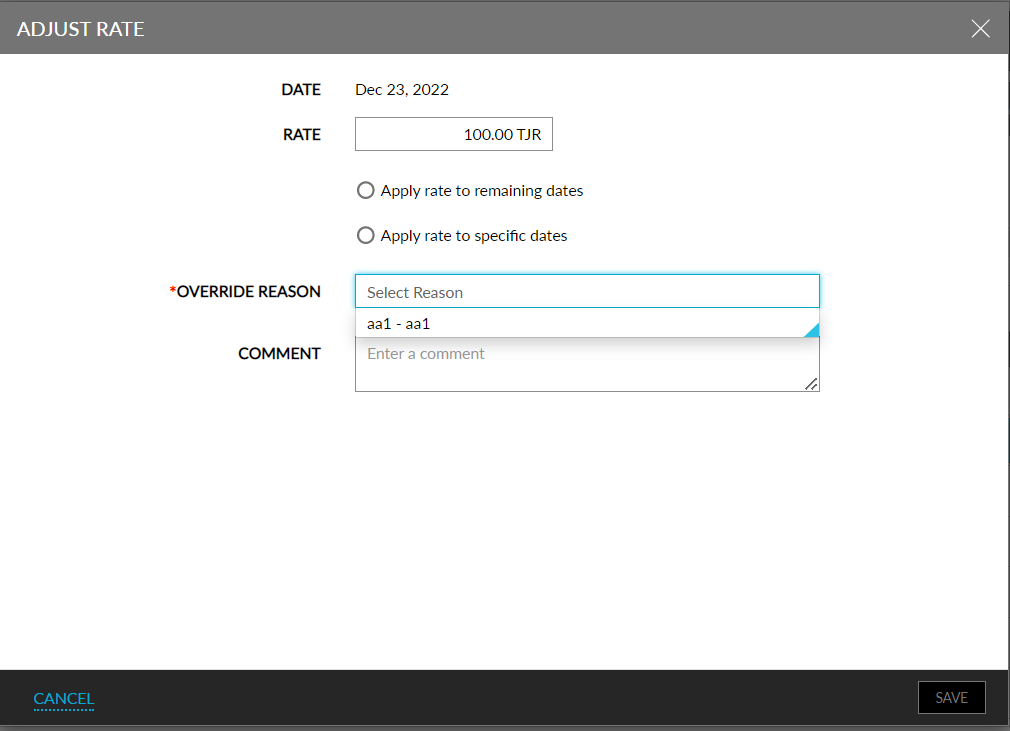
Refer to the following table and fill in the fields to adjust rates:
|
Field |
Description |
|---|---|
|
Date |
The date of stay |
|
Rate |
The rates for the respective date |
|
Apply rate to remaining dates |
Select the checkbox to apply the rate to the remaining dates |
|
Apply rate to specific days |
Select the checkbox to apply the rate to specific days |
|
Override reason |
Select an override reason for rate adjustment |
|
Comment |
Add comments about the rate adjustment |
When Apply rate to remaining dates is selected, the same pricing model will apply to all dates. When Apply rate to specific days is chosen, the rate will be applied only to specific days selected by users in the calendar widget. The user must calculate and independently set room rates for each night since component prices may vary. For packages, the room rate only refers to the room rate portion of the package. It does not include the components in the package.
When the Rate Override Reason feature setting is enabled and override reasons are configured in the Rate Override Reason page (Settings à All Settings à Reservations à Rate Override Reasons), users can select an override reason from the Override Reason dropdown, when adjusting the rate. If reasons are configured but no reasons are active, this field will not be displayed when users choose to override the rate.
Click Save. A confirmation page is displayed.
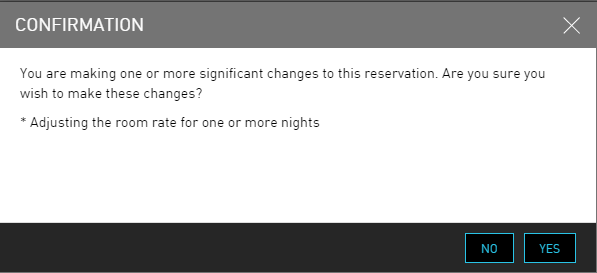
Click Yes to confirm the rate change.
Click Book. The Book Reservation dialog box appears.
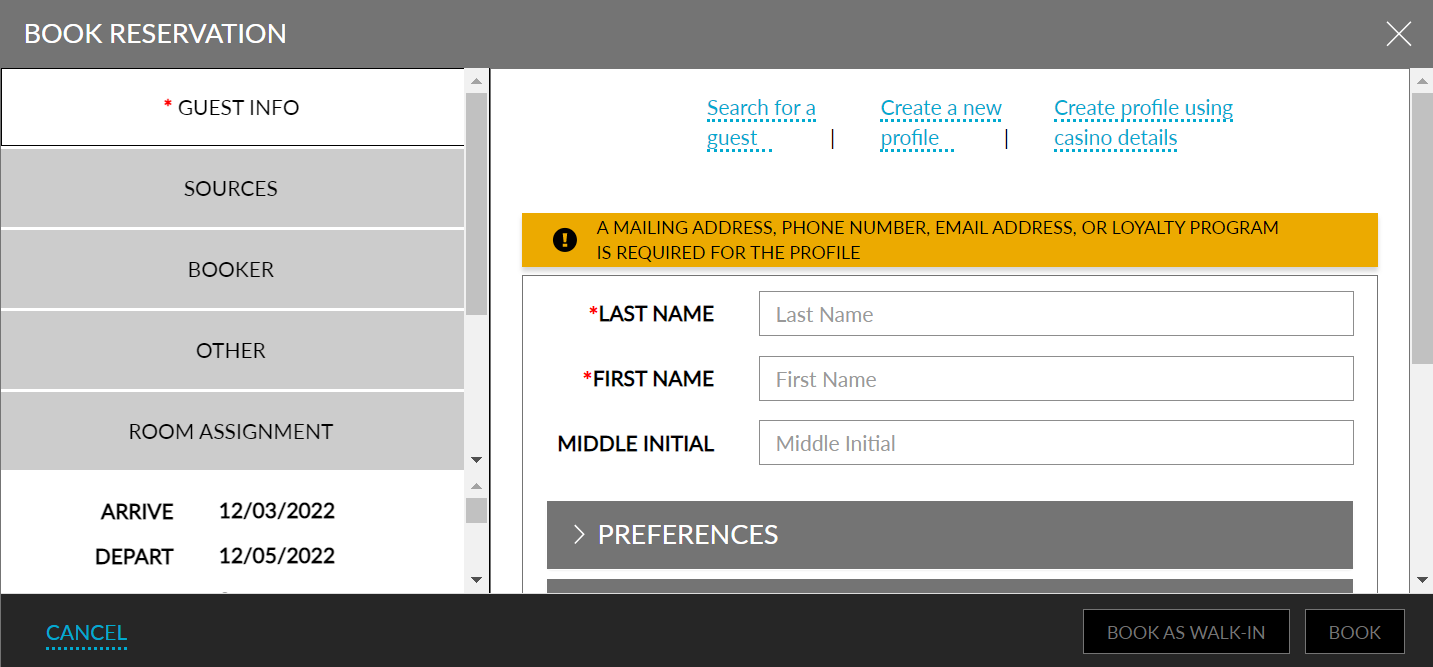
To search for the existing guest, enter the name of the guest in the Search field. Based on the entered details, the search results are displayed.
Click the required profile. The existing guest profile details are displayed in the Guest Info tab. Make any necessary updates, if required.
If the guest is visiting for the first time, click Create a new profile to add a new guest profile.
Navigate to the Guest Itinerary tab.
Itineraries from other connected applications like Agilysys Golf and Agilysys Spa can be added to the reservation. Contact Agilysys to enable this feature and for further support.
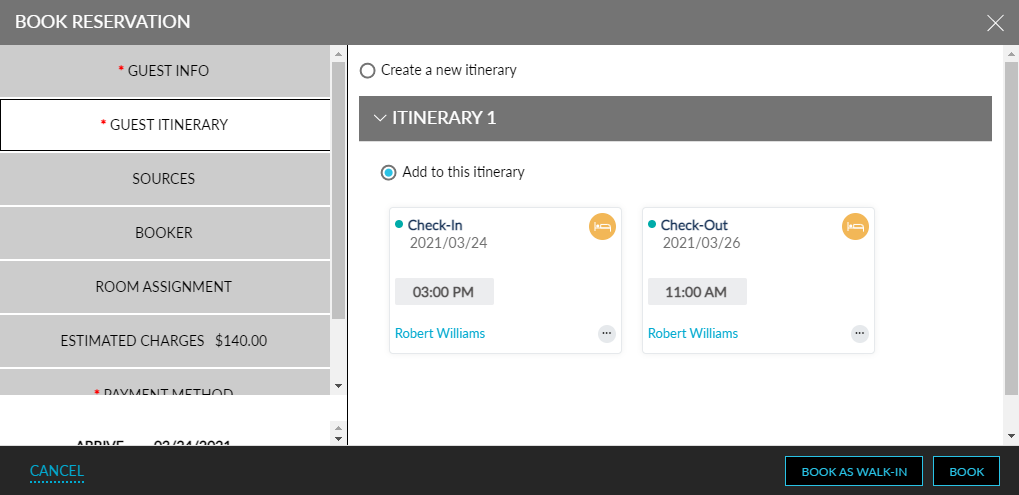
Create a new itinerary by selecting Create a new itinerary field. Instead, users can also add existing itineraries by choosing the itineraries and add them to the booking.
Navigate to the Sources tab. The Sources tab is displayed.
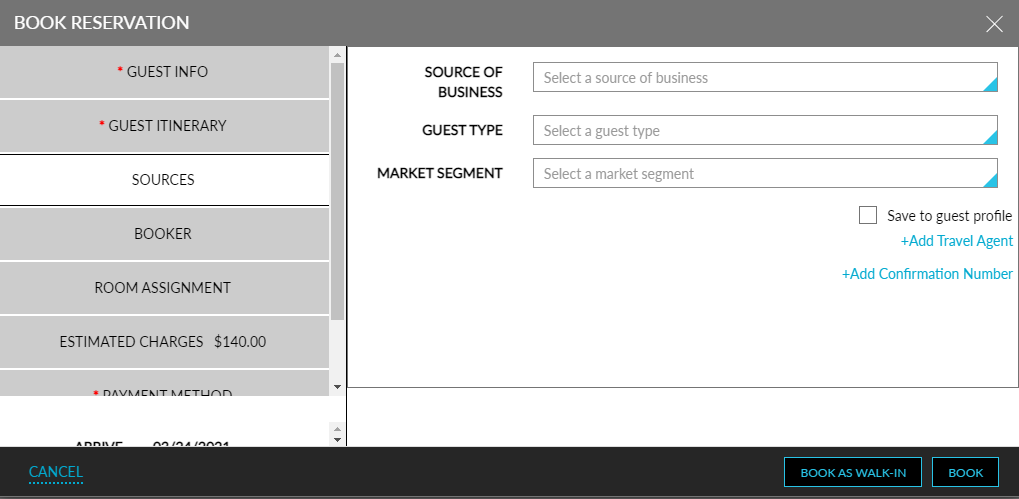
Refer to the following table and fill in the fields to book a reservation:
|
Field |
Description |
|---|---|
|
Source Of Business |
The source of business of the property. Sources are used to determine which markets are feeding the property's business. Use this to make decisions about inventory and rates based on the business volume generated by those sources |
|
Guest Type |
The type of guest on the property. Guest types are used to determine the types of people who stay at the property. For example, business travelers, leisure travelers, and more. Use this to find trends in the length of stay, revenue per guest, and lead time |
|
Market Segment |
The market segments of the guest stay. Market segments are used to identify the purpose of the guest's stay. Use this to identify trends in the length and days of stay for the property |
|
Save to guest profile |
Select the checkbox to add the sources on the guest profile |
|
Add Travel Agent |
Click to link a travel agent to the booking if that information applies to this reservation |
|
Add Confirmation Number |
Click to link a third-party source to the booking if that information applies to this reservation |
This setting provides accurate reporting on marketing trends, revenue management, and long-term occupancy forecasting.
Create a routing rule for the reservation or view any existing routing rules in the Other tab.
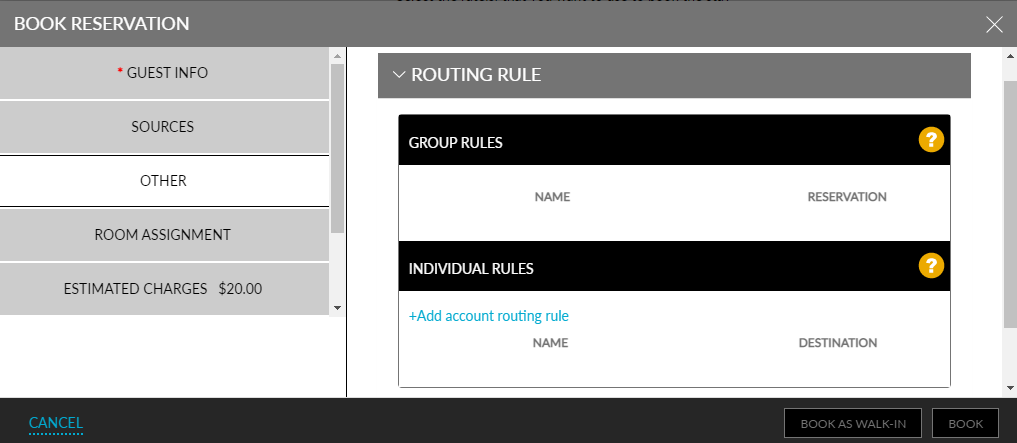
Refer to the Routing Rule Templates section on how to create a routing rule template.
Users with access to the following roles can mask guest names or provide an alias name for guest names, associated as a Non-Registered Guest in the Other section:
-
System Administrator
-
Stay Hotel Manager
-
GSA Supervisor
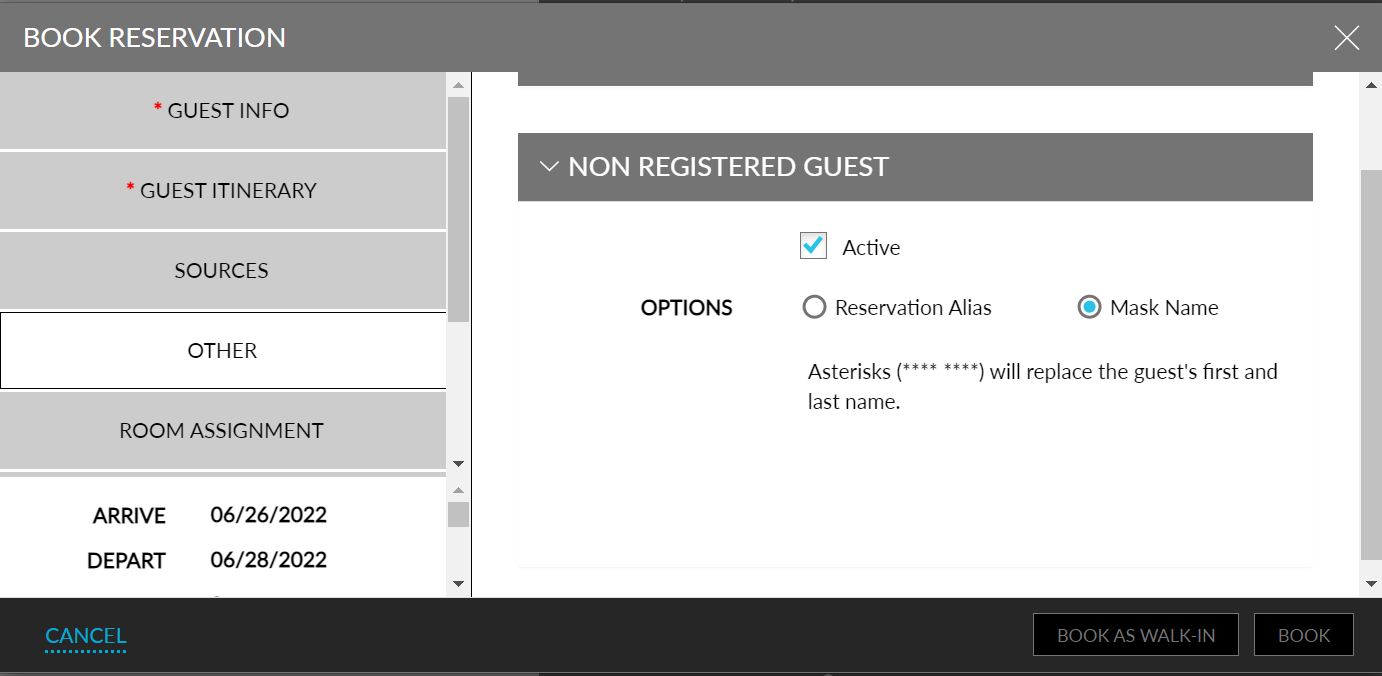
Perform the following steps to mask the guest’s name or provide an alias name:
Turn on the Enhanced Non-Registered Guest and the Reservation Alias feature settings.
Enable the Active flag under Non-Registered Guest in the Other section. The following options will be displayed:
-
Reservation Alias: Select this option to provide an alias name for the guest’s name. Enter the alias name to be displayed.
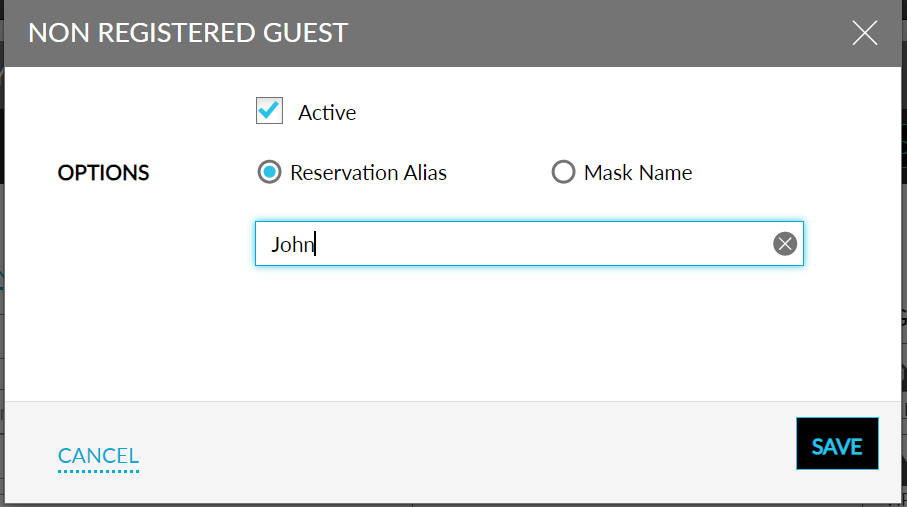
Once saved, the guest’s name at the top of the Reservation page will change to an alias name. An info icon is displayed next to the alias name for users with the required permission. Mouse over the icon to see the original name of the guest.

-
Mask Name: Select this option to mask the guest’s name with asterisks.
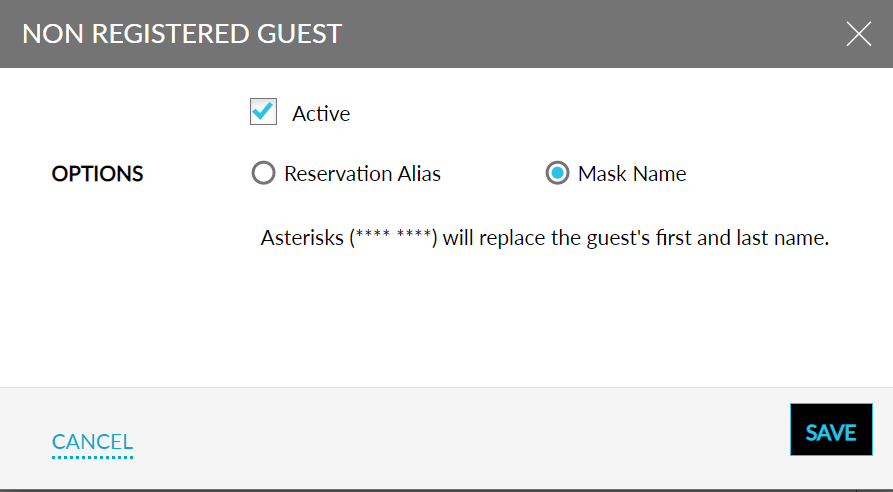
Once saved, the guest’s name at the top of the Reservation page will be masked by asterisks. An info icon is displayed next to the masked name for users with the required permission. Mouse over the icon to see the original name of the guest.
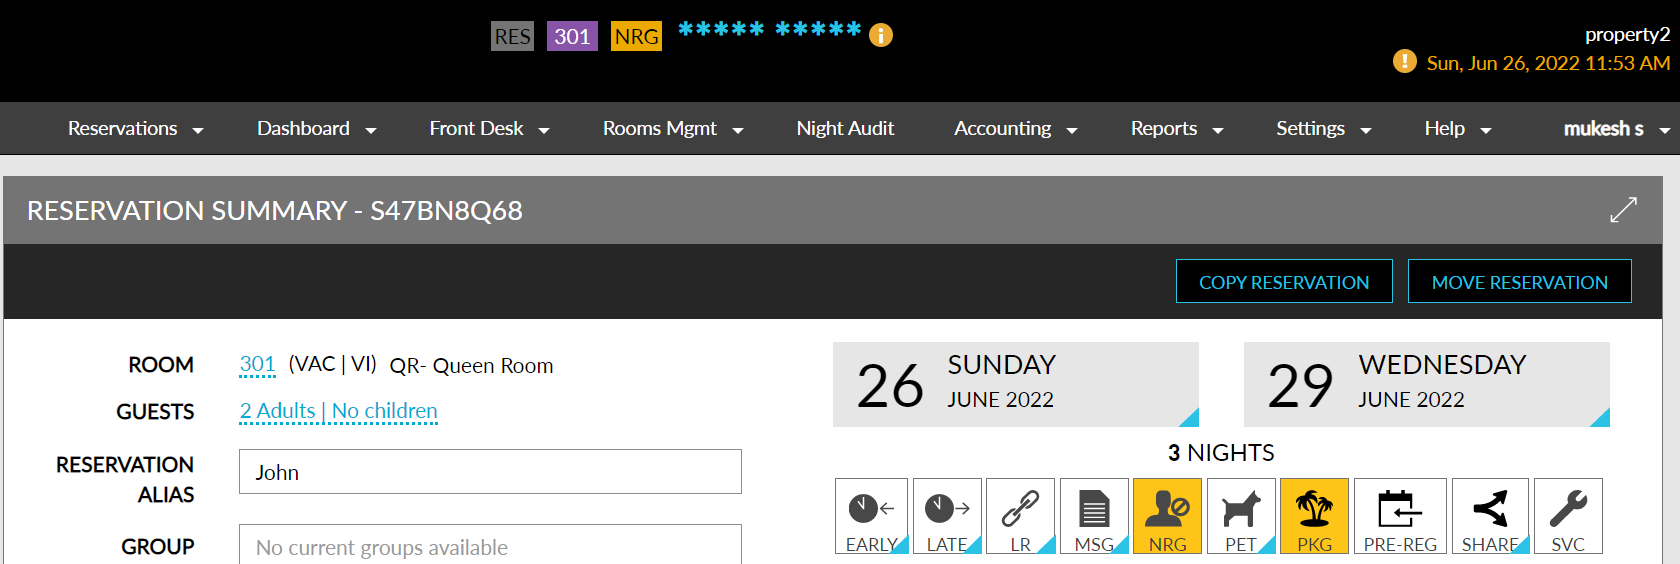
The guest’s name will be hidden in the following places:
-
Guest Name at the top of the Reservation Page
-
Search Results in the Front Desk à Home page
-
On the reservations list on the Front Desk à Home page à Reservation Tab
-
Guest name on the Front Desk à Home page à Rooms Tab
-
Tape Chart
-
Assign Room Modal in Tape Chart
-
Batch Operations
-
Check-in
-
Deposit Due
-
Settle & Checkout
-
Batch Edit
-
Folio
-
Batch Posting
-
Schedule Room Moves
-
-
Welcome script for the Reservation
Add a booker to the reservation in the Booker tab.
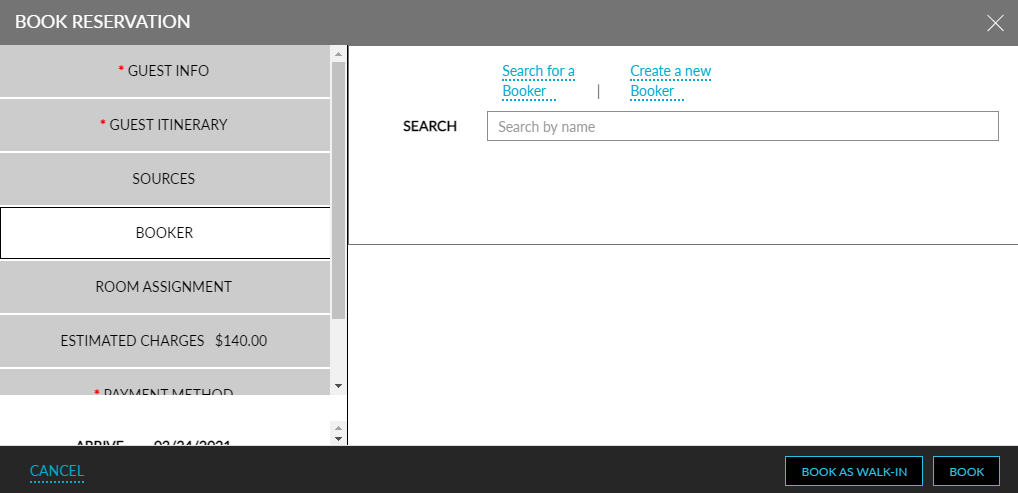
A person responsible for making a reservation on behalf of a guest is called a booker.
Any existing guest profile or a new guest profile can be added as a booker while booking a reservation. Details of the booker will be available in the Reservation Summary of the booking.
The feature setting Booker Profile, when disabled, will hide booker profiles associated with reservations, and users will not be able to add a booker to a new reservation.
Navigate to the Room Assignment tab to assign a room for the booking.
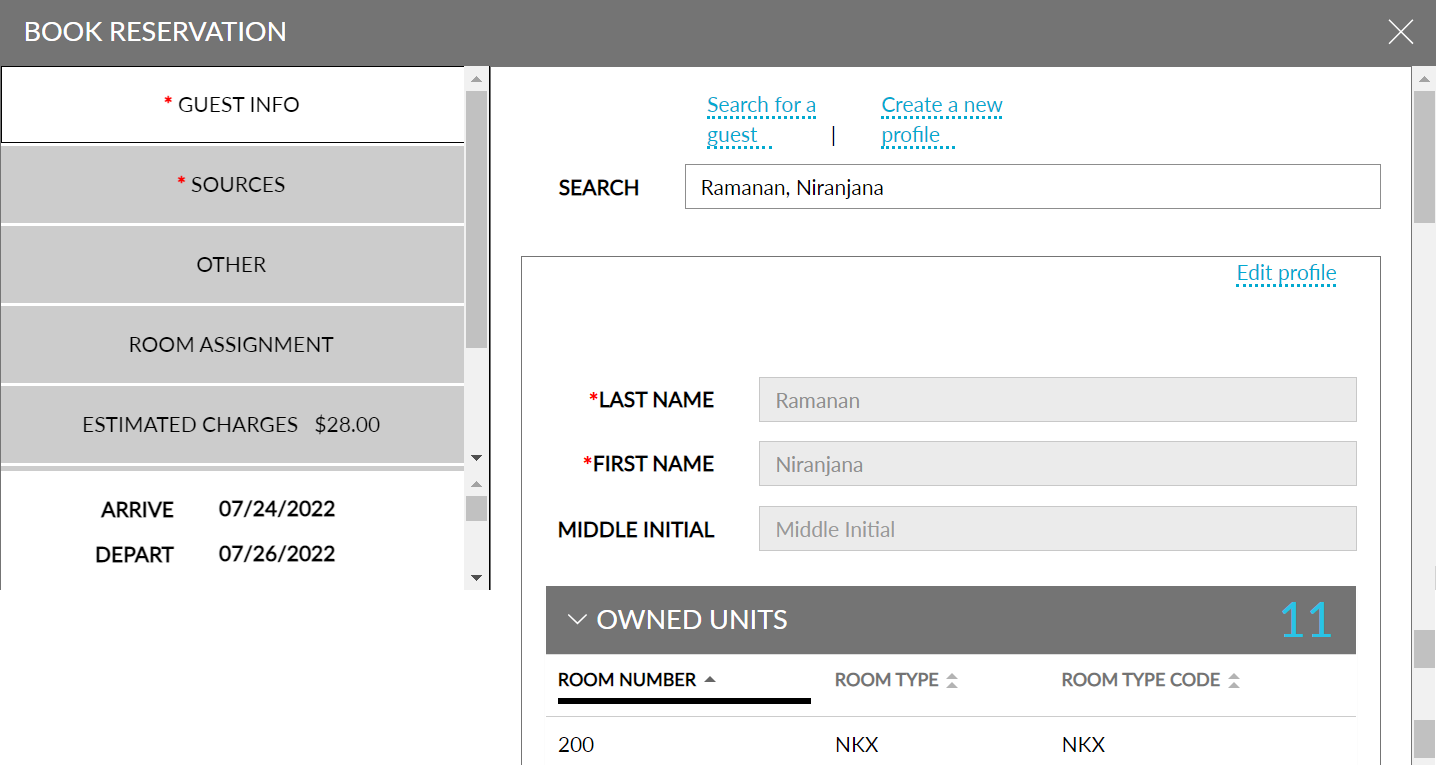
Users can view the list of units owned by the guests under the Owned Units section. Users can refer and select the rooms to be assigned for reservation. This feature to view owned units is controlled under the following feature settings, Profile search prior to new reservation and Owners.
Navigate to the Estimated Charges tab in the Book Reservation dialog box. The Estimated Charges tab is displayed.
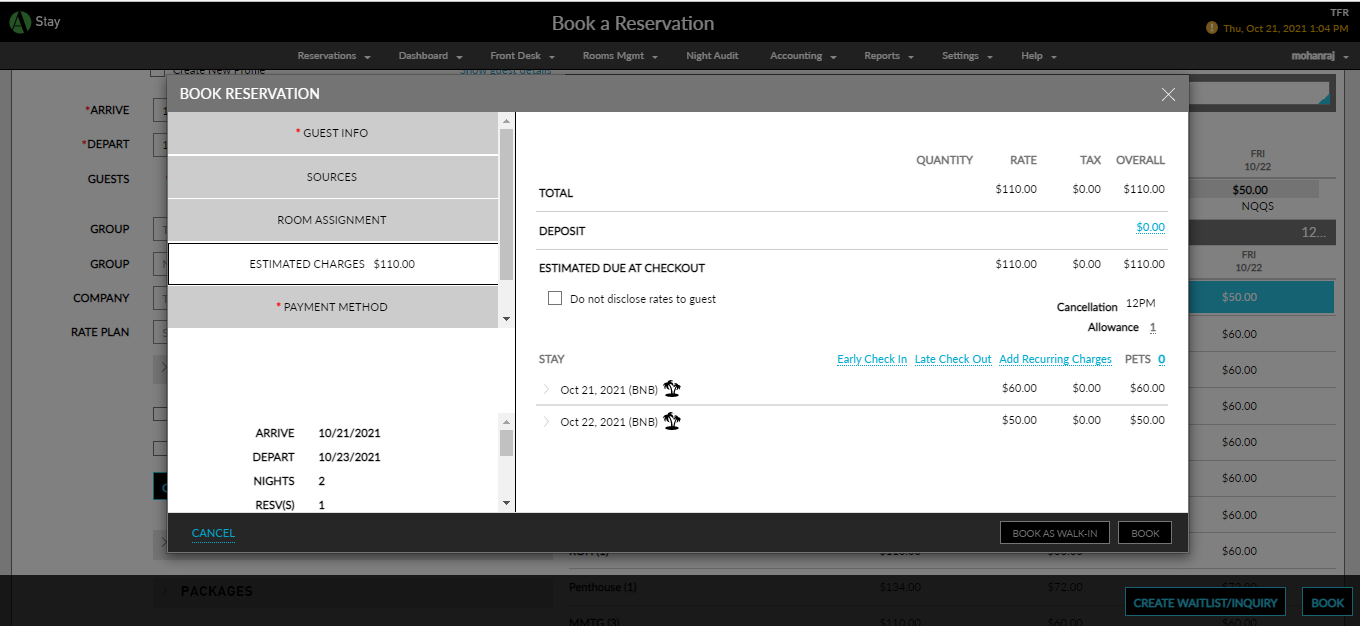
Review the charges to ensure that they are acceptable.
As applicable, add early check-in fee, late check-put fee, recurring charges, pets, and add ons.
Whenever an Early Check-In, Late Check-Out, Recurring Charges, or Pets are added to a reservation, an icon is displayed next to the respective label with the count in braces.
Click the Deposit link to add the deposit amount. The Deposit dialog box appears.
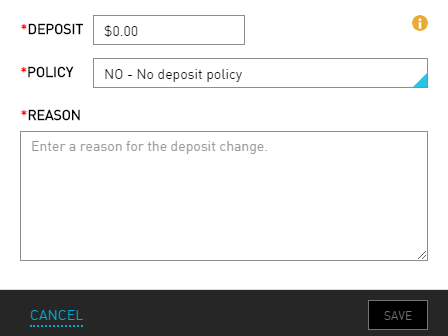
Refer to the following table and fill in the fields to add deposit details:
|
Field |
Description |
|---|---|
|
Deposit |
The amount to be deposited |
|
Policy |
The required policy from the drop-down list |
|
Reason |
The reason for the deposit change |
Click Save.
Select the Do not disclose rates to the guest checkbox to suppress the rate information on the reservation.
Click the Add Recurring Charges link to add the recurring charges. The Add a Charge dialog box appears.
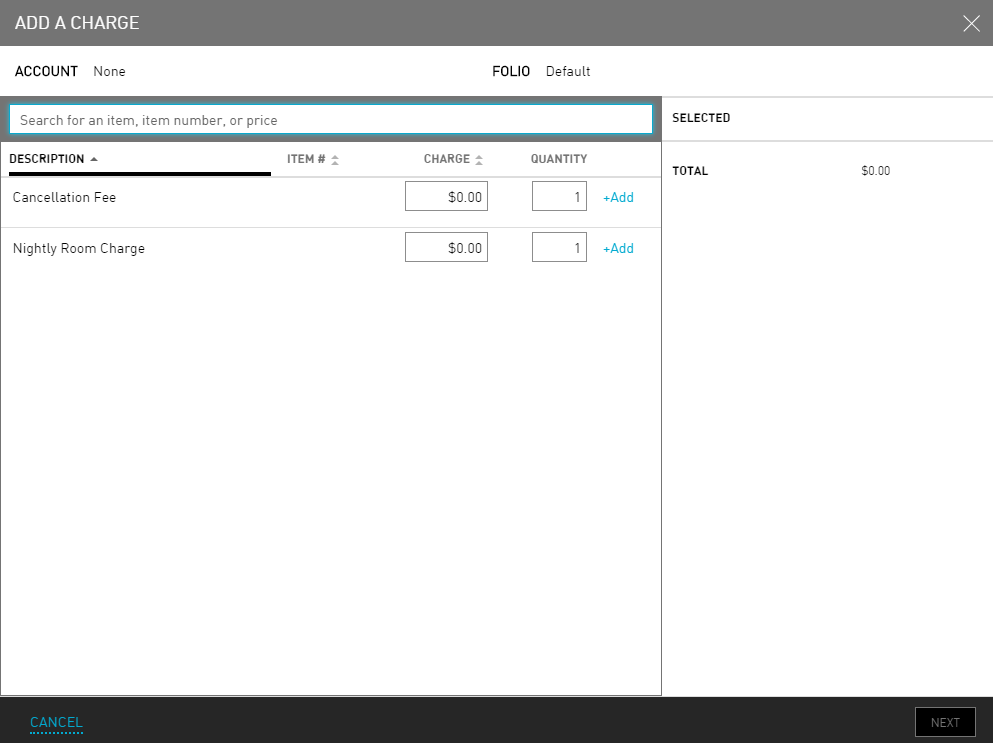
Refer to the following table and fill in the fields to add charges:
|
Field |
Description |
|---|---|
|
Charge |
The amount to be charged from the guest |
|
Quantity |
The quantity of the charge |
Click Add to add the respective charge.
Click Next. The Add a Charge dialog box appears.
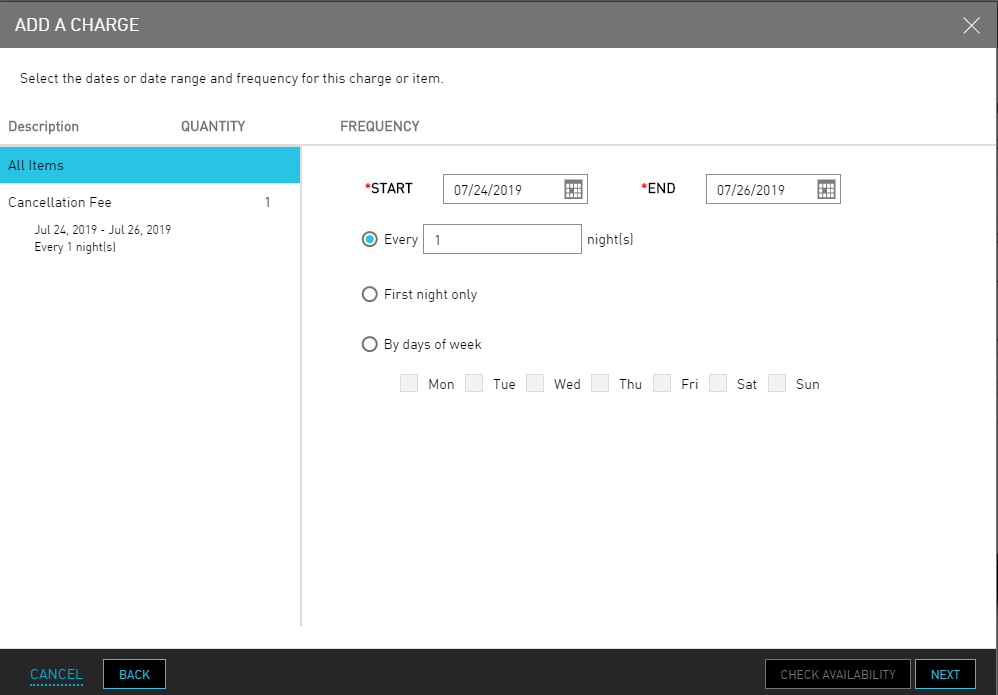
Refer to the following table and fill in the fields to set the frequency:
|
Field |
Description |
|---|---|
|
Start |
The start date of the charge |
|
End |
The end date of the charge |
|
Every |
The frequency of nights to apply the charge |
|
First night only |
The charges are applied only for the first night of stay |
|
By days of week |
The charges are applied for the required days |
Click Next. The Add a Charge dialog box appears.
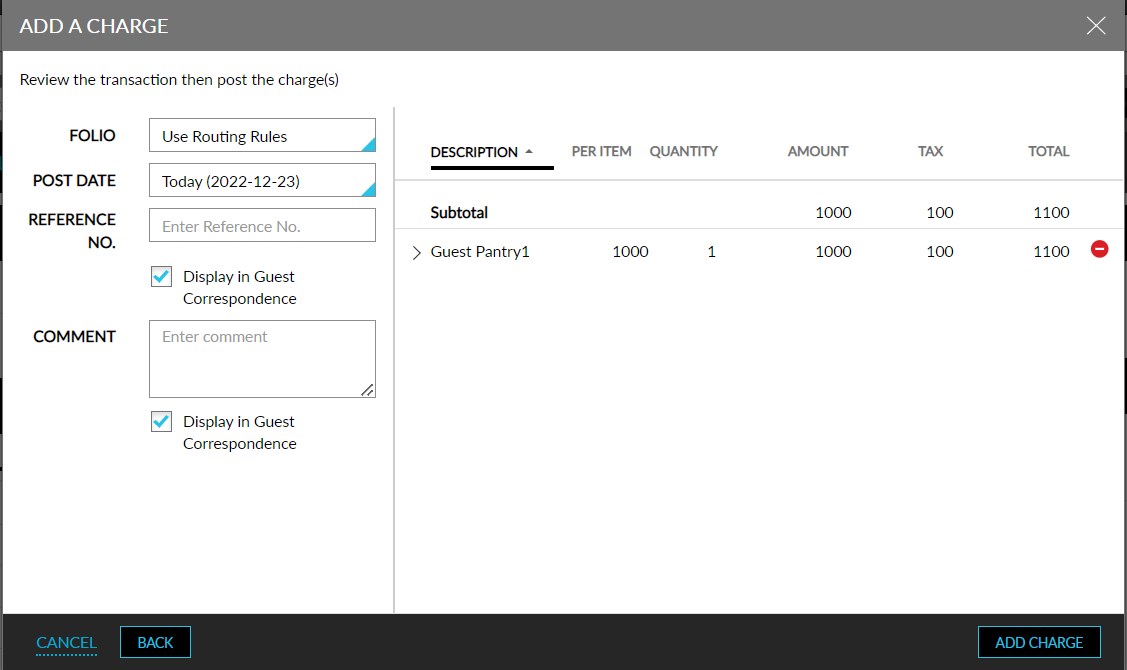
Enter the Reference number and comment for the charge. Users can do so by enabling the required field in the Folio Defaults section in the Guest Accounting screen.
Click Add Charge.
When new charges are added or modified while creating a reservation, the updated amount is displayed in the Estimated Charges section.
Click the Pets link on the Book Reservation page to add pets to the reservation. The Add Pets dialog box appears.
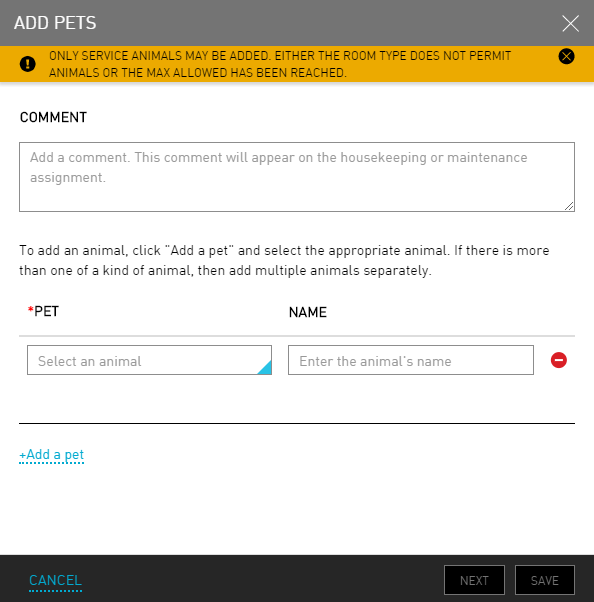
Refer to the following table and fill in the fields to add pets:
|
Field |
Description |
|---|---|
|
Comment |
The comments about the pets |
|
Pet |
The type of pet animal |
|
Name |
The name of the pet animal |
Click Add a pet to add more pet animals.
Click Save.
Click the Payment Method tab. The Payment tab is displayed.
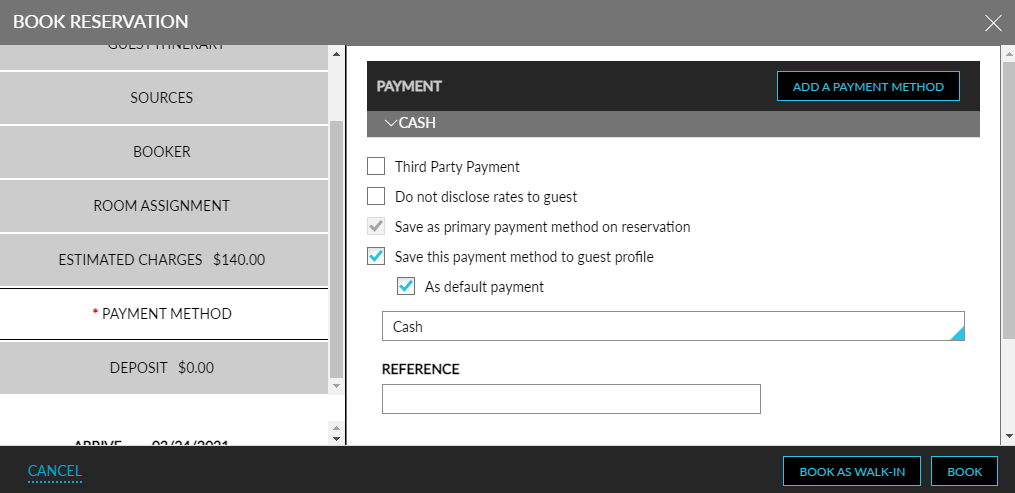
Refer to the following table and fill in the fields to enter the payment details:
|
Field |
Description |
|---|---|
|
Third-Party Payment |
Select for a third-party payment mode |
|
Do not disclose rates to guest |
Select if the rates must not be disclosed to the guests |
|
Save as primary payment method on reservation |
Select to save the payment method as primary for the reservation |
|
Save this payment method to guest profile |
Select to save the payment method to the guest’s profile |
|
As default payment |
Select to set the payment method as the default payment method for the guest |
|
Select a payment method |
Select the payment method from the drop-down list |
Navigate to the Deposit tab. The Deposit tab is displayed.
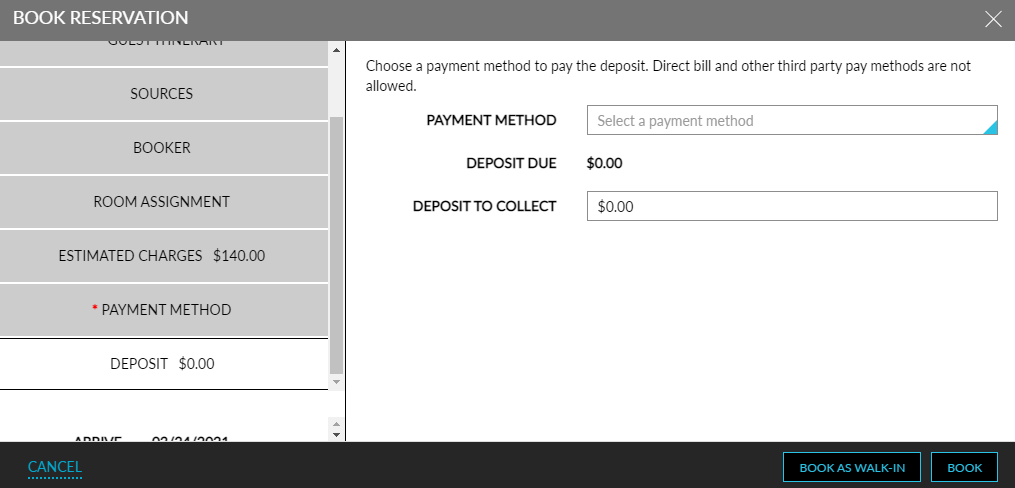
Refer to the following table and fill in the fields to enter the deposit details:
|
Field |
Description |
|---|---|
|
Payment Method |
The payment method to pay the deposit amount |
|
Deposit Due |
The due amount deposited |
|
Deposit to Collect |
The deposit amount to be collected |
|
User Name |
The username for authorization |
|
Password |
The password for authorization |
Click Book to create the reservation, or Book as Walk-In if the guest walked in and is ready to be checked in. The room booking is created successfully.